There’s a particular sadness in the eyes of a GM halfway through a 250-page campaign book.
You can see the journey: they bought the shiny hardback, they decided to “run it as written,” they tried to read every word… and now they’re trapped in Chapter 4: Minor Trade Routes of the Eastern Barony, quietly regretting every life choice that led them here.
Let’s not do that.
This article is about how to prepare a published adventure so it actually works at your table, without:
- memorising the book
- handcuffing yourself to the plot
- ignoring all the weird, clever stuff that made you buy it in the first place
This article is written with the same ethos as with reading rulebooks: this is a technical manual with delusions of being a novel. You’re not studying it, you’re strip-mining it.
With one extra twist:
You’re not just trying to make it usable.
You’re trying to squeeze all the interesting bits into play.
Before You Prep, Work Out What You’re Actually Holding
Our first job is to identify what flavour of adventure this thing is. Most modules are some mix of:
- Mystery / Investigation
Multiple locations, clues, suspects, red herrings. Players chase information, not orcs. - Event-Driven / Timeline
Things happen because time passes or NPCs act. If the PCs do nothing, the world marches on. - Location-Based Exploration
Dungeons, ruined cities, creepy mansions, megadungeons. The map is the star. - Railroad Scene Chain
A sequence of scenes that assume the players go A to B to C to Finale. Often disguised as something else. - Hex / Square Crawl / Sandbox
Big map, lots of little points of interest, procedures for travel and exploration. Player-driven direction.
The adventure may be a hybrid (mystery in a city that uses a light hex crawl in the countryside with a railroad finale) but one structure usually dominates. That’s the one you prep around. Designers talk a lot about these structures because once you know what you’re dealing with, you can support it instead of fighting it.
Now that you’ve named the beast, you can build the tool that will save your brain.
The Secret Weapon: Node Graphs, Not Paragraphs
I swear by node graphs for modules.
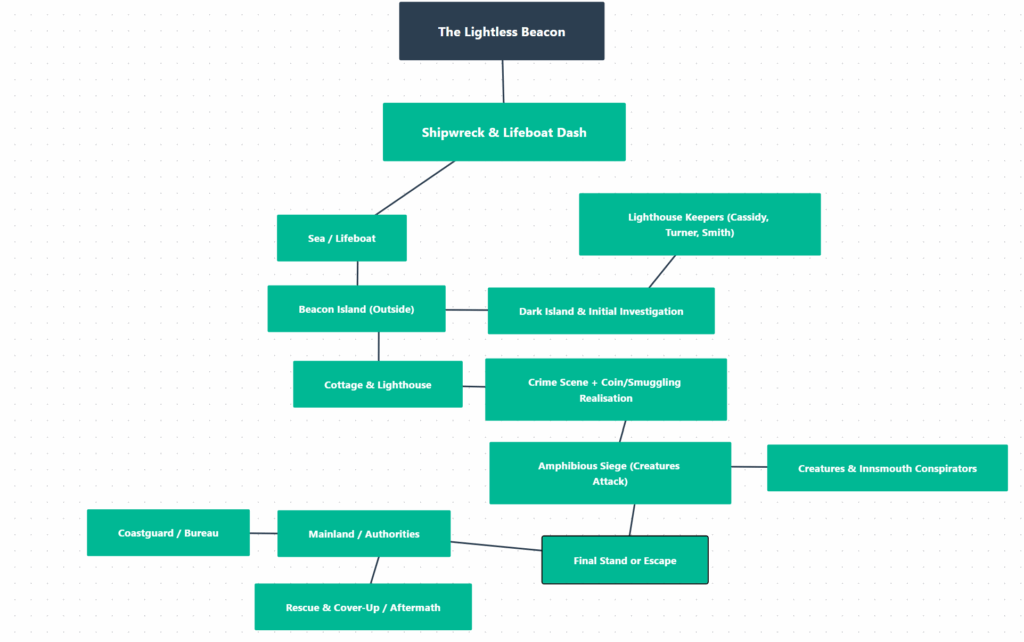
Node graphs are not maps and they’re not a flowchart of boxed text. They’re a simple diagram of “big things that matter” and how they connect.
A node can be:
- A location (The Bleak Lighthouse, The Crimson Archive)
- An NPC or faction (The Archive Keepers, Captain Drella)
- A situation or event (The Coronation, The Demon Breakout)
- A revelation (realising who the true villain is, discovering the cursed relic)
Then you draw arrows to show how the players might move between nodes:
- “Find clue here that points there”
- “NPC sends you there”
- “If you fail, things escalate to this event”
Good node-based advice says: every important node should lead to at least one other node (ideally more), and scenes should provide concrete “next steps” so players never hit dead ends.
Crucially you are not re-writing the keyed map or scene descriptions. Those are already in the book.
Your node graph is what the book didn’t organise for you.
You’ll still reference the module for actual room contents or boxed text, but the graph is how you think during play.
Stick page numbers next to nodes like a goblin librarian:
“Bleak Lighthouse (p.37–42)” to “Fisherman’s Gossip (p.18)” to “Cult Shrine (p.55–58)”
Now let’s look at how this helps with different adventure types.
1. Mystery / Investigation Adventures
What you’ve got
Lots of locations, witnesses, clues, red herrings, and possibly a lovingly over-complicated conspiracy diagram from the author.
Campaign-level prep
Focus on three things:
- The Truth
- What actually happened?
- Who did what, where, when, and why?
- The Critical Revelations
- What must the players learn for the scenario to work?
- Where could they learn each thing? (Ideally 2–3 places per crucial clue.)
- The Node Graph
- Nodes: key locations, suspects, organisations, and major revelations.
- Arrows: “clue leads here”, “this suspect points to that place”, “evidence contradicts their alibi”.
Think in terms of information flow, not plot. Node-based mystery prep works beautifully when each location/suspect offers several leads to other nodes.
This is where you extract the novel stuff:
weird rituals, unique NPC motivations, that bizarre occult detail the author clearly loved. Make sure those live in nodes that are easy to reach.
Session-level prep
For each session, you want:
- 3–5 likely nodes the players might hit (marked on your graph)
- A short “what they can get here” list for each:
- NPCs and their agendas
- Physical clues
- Emotion / vibe (e.g. “this place should feel wrong”)
- A couple of floating clues you can drop anywhere if they stall
You do not need to perfectly track their progress through the “intended” flow. Your graph and clue lists let you improvise without losing the plot (literally).
2. Event-Driven / Timeline Adventures
What you’ve got
A calendar, a doom clock, or a sequence of “when X happens, then Y happens.” If the players do nothing, the world trundles towards disaster.
Campaign-level prep
First, identify:
- The Spine Events
The big beats that will happen unless the PCs intervene: assassination, invasion, ritual, eclipse. - Triggers
- Time: “Day 3: riots begin.”
- Action: “If they kill Lord Varr, his brother declares war.”
- Inaction: “If they don’t stop the cult by Week 2, the demon breaks free.”
- The Default Doom Track
What happens if the PCs never get involved? Write this as a straight line.
Then convert that into nodes:
- Each event is a node.
- Arrows show:
- How one event leads to another
- Where the PCs can alter or redirect the chain
Timeline-heavy advice tends to recommend understanding the flow first, then deciding where you’re comfortable letting players break it.
Session-level prep
For the next session, answer:
- “What happens if the PCs do nothing this week?”
- That’s your baseline event or two.
- “Where are the hooks?”
- Which events will intersect directly with the PCs? (attack on their allies, public festival, etc.)
- “What 2–3 nodes are most likely this session?”
- Prep a couple of maps, NPCs, and consequence notes for those.
Everything else stays on your timeline, ready to advance between sessions.
3. Location-Based Exploration (Dungeons, Mansions, Megadungeons)
What you’ve got
Maps, keyed rooms, wandering monsters, secret doors. The book is often lovingly detailed in all the ways you do not need to memorise.
Campaign-level prep
Ignore individual rooms at first.
Instead, look for:
- Regions / Zones of the location
“Upper Ruins”, “Catacombs”, “Elemental Forges”, “Goblin Warrens”. - Factions & Ecosystem
Who lives here? Who hates who? Who just wants to be left alone? - Set-Piece Encounters
The scenes the designer clearly cares about:- The bridge over lava
- The throne room where the lich monologues
- The ritual chamber mid-ceremony
Treat each region or faction HQ as a node. Arrows show:
- Physical connections (stairs, secret tunnels, teleporters)
- Political connections (alliances, rivalries, blackmail material)
This is similar to how people talk about using structured procedures for dungeons, cities, and wilderness. Your job is to understand the structure, not memorise room 12b.
Session-level prep
Assuming the players are headed into the place:
- Pick 2–3 regions they’re most likely to hit next.
- Skim the room keys for those areas:
- Highlight the set pieces
- Mark any rules-heavy bits (complex traps, unique monsters, chase set pieces)
- Jot down:
- “What happens if this faction spots them?”
- “What changes here after they make a lot of noise?”
You’ll still read the room text at the table, but you’ll know why the room matters and where the players might go next.
4. Railroad Scene Chains (a.k.a. “Strongly Suggested Narrative Experiences”)
What you’ve got
A series of scenes in a recommended order. Often forced transitions: “After the PCs are inevitably captured…” or “When they agree to help the Duke…”
Campaign-level prep
You don’t have to tear the rails up. Just… loosen a few bolts.
For each scene, identify:
- Purpose
What does this scene achieve in the story? Reveal? NPC introduction? Travel? Big fight? - Inputs
What needs to be true for this scene to make sense? (e.g. “PCs care about the kidnapped child.”) - Outputs
What new information, allies, or problems does this scene give the PCs?
Now turn the sequence into a node graph of scenes, not a locked line:
- Arrows show “this scene leads naturally to these 1–2 next scenes”
- Ask for each scene: “If the players skip or derail this, which other scenes still work?”
Advice for running published adventures leans heavily on “make it your own”. Change or skip scenes to fit your group and treat the book as a suggestion, not a contract.
Session-level prep
For a given session:
- Pick 3 scenes you’d be happy to run in any order.
- Make sure each one:
- Has clear stakes
- Presents at least one decision
- Points to another node (scene, location, revelation)
If your players completely ignore the intended hook, look at your graph and simply enter through a different node. The story still moves; it just took the scenic route.
5. Hex / Square Crawls & Sandboxes
What you’ve got
A big map, lots of numbered hexes or locations, encounter tables, travel rules. Possibly a West Marches vibe, possibly “fantasy tourism with consequences.”
Campaign-level prep
Do not prep every hex. That way lies madness and spreadsheets.
Instead:
- Procedures First
- How do you handle:
- Travel and time?
- Getting lost?
- Random encounters and weather?
- Hexcrawl checklists emphasise that procedures are the engine; the map is just flavour.
- How do you handle:
- Anchor Nodes
- Home base / town
- 3–6 major locations (dungeons, lairs, ruins)
- Any big factions (raiders, cults, weird forest spirits)
- Node Graph
- Nodes: anchors, factions, big mysteries
- Arrows: rumours, trade routes, visible landmarks, faction missions
Session-level prep
Before each session:
- Decide where the PCs are likely to go next directionally, not precisely.
- Prep:
- 1–2 anchored locations in that direction
- 3–5 complications / encounters you can drop into any hex (ruined shrine, caravan, strange omen)
- A short list of rumours pointing back into your node graph
The map is the board; your node graph is the network of things that actually matter when they get there.
Campaign Prep vs Session Prep: What’s Actually Worth Your Time?
Let’s zoom out for a second.
For the whole campaign, you want to understand:
- The overall structure (mystery, timeline, dungeon, railroad, sandbox, or hybrid)
- The big moving parts:
- Villain plans / doom tracks
- Key locations and factions
- Major revelations or turning points
- Where the cool, novel stuff lives:
- Unique setting elements
- Special mechanics (sanity rules, domain turns, political reputation, etc.)
- Signature monsters, magic, or lore you want to show off
A lot of GM advice says to read or skim the whole adventure to get the big picture, then decide what you’re actually going to use and what you’ll quietly ignore.
For each session, you only need:
- 3–5 nodes you expect to come up (locations, scenes, events)
- For each:
- A sense of stakes / purpose
- A few NPC names and quirks
- Notes on “what they can get here” (clues, allies, treasure, trouble)
- A way for each node to point to at least one other node
- Your normal table kit (rules summary, character sheets, snacks, emotional resilience)
That’s it. If you find yourself summarising entire chapters you might not use? Stop. Go back to the node graph.
Getting Value from the Weird & Wonderful Bits
Most published modules hide their best ideas like a dragon hoarding magic items under ten layers of read-aloud text.
When you skim, keep a particular eye out for:
- Unique factions
“These people ride giant beetles and worship a traffic cone”. That’s gold. Make them a node. - New mechanics or subsystems
Domain management, survival rules, sanity tracks, political influence clocks. Highlight these and ask:
“How can I guarantee this actually happens in play?” - Striking imagery
The author clearly had a specific mental picture: a floating cathedral, the city of glass, the whale-ship.
Build sessions that point at those things.
When you find something cool, attach it to a node that players will almost certainly visit. Don’t bury your favourite ideas three layers down on the “optional side quest” branch that no one ever takes.
Shrinking an Adventure or Campaign Down Into a One-Shot
Sometimes you buy a 10-part epic and then realise you actually have… three hours on a Thursday evening.
You can still use it. You just need to be ruthless.
Step 1: Find the core
Answer:
- Who is the main antagonist?
- What is the central conflict or mystery?
- What is the most dramatic location or set piece?
Your one-shot is that conflict, with that villain, in that place.
Step 2: Build a tiny node graph
You get:
- Opening node: start in media res (mid-heist, mid-battle, mid-ritual).
- Two mid nodes: complications or reveals.
- Final node: confrontation / escape / terrible choice.
Short adventures should aim towards three core scenes plus a finale, with any extra encounters as optional branches you can drop if time runs short.
Step 3: Cut everything that isn’t those nodes
Throw away:
- Travel sequences
- Side quests
- Half the NPCs
- Intricate political backstory no one will remember
Keep:
- A clear objective (“stop the ritual,” “steal the thing,” “survive the night”)
- Occasions to show off:
- The game’s signature mechanics
- The module’s signature weirdness
Step 4: Arrange for instant buy-in
For a one-shot:
- Use pregens tied directly to the situation (all cult defectors, all royal guards, all doomed villagers).
- Give each PC one hook:
- Why they care
- What they stand to lose
- A secret or leverage they hold
You’re not building an ongoing ensemble. You’re loading a cannon.
Final Thoughts: You’re Adapting, Not Auditioning
Running a published module is not a test of your loyalty to the text.
Your job is to:
- Understand what kind of thing it is
- Turn it into a node graph of interesting stuff
- Bring the novel, strange, and flavourful bits to the front
- Prep just enough for the next session (or the one-shot)
- Cheerfully ignore anything that doesn’t serve your table
The author will not appear behind you mid-session and say, “Ah, actually, that goblin was meant to be in Area 12b.”
If your players are engaged, the cool ideas are hitting the table, and the node graph is doing its quiet little job behind your screen, you’re doing it right. Even if you never once read Appendix G: Seventeen Varieties of Regional Cheese.